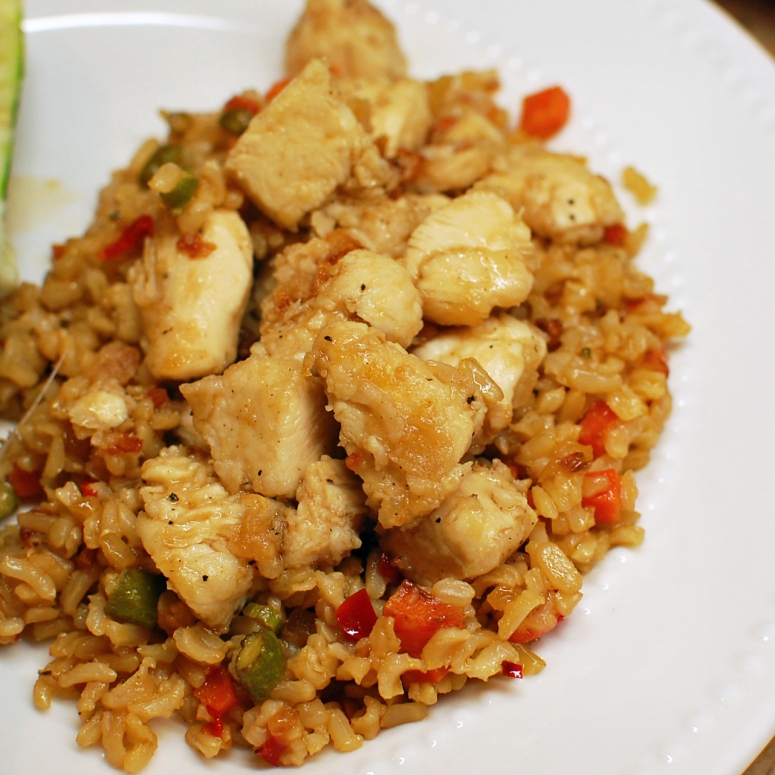
Skinny Chinese Pepper Chicken

A healthy version of a Chinese favorite!

Yesterday, I shared with you the recipe for Skinny Vegetable Fried Rice, and today I’m sharing one option for topping that rice – Chinese Pepper Chicken.  Pepper Chicken is my favorite Chinese dish (and I really don’t like that many Chinese foods!  I’m wierd like that), but it is breaded and fried.  Not very skinny!  So, I wanted to create a version that was a little better for you. 

The original recipe called for Oyster Sauce, but I didn’t have any on hand (and didn’t have the time or energy to run to the store), so i used a combination of Soy Sauce, Worchestershire Sauce and Spenda brown sugar.    If you have Oyster Sauce, go ahead and use that.

Skinny Chinese Pepper Chicken

  • 1 pound chicken breasts (or tenders), boneless, skinless
  • 4 tbsp cornstarch
  • 4 tbsp canola oil

Sauce:

  • 1/4 cup soy sauce
  • 1 tbsp Splenda Brown Sugar
  • 1 tbsp Worchestershire Sauce
  • 1 tsp Pepper

In small bowl, combine sauce ingredients and set aside.

Cut chicken into bite size pieces.  Dust chicken with cornstarch until well coated.  Heat oil in wok or other non-stick pan.  Cook chicken in oil until golden brown, remove and set aside.  Add sauce mixture to pan and heat until bubbling.  Add chicken back in, stirring to fully coat chicken in the sauce.  Serve over Skinny Fried Rice.


Serves:4

Calories Per Serving: 289


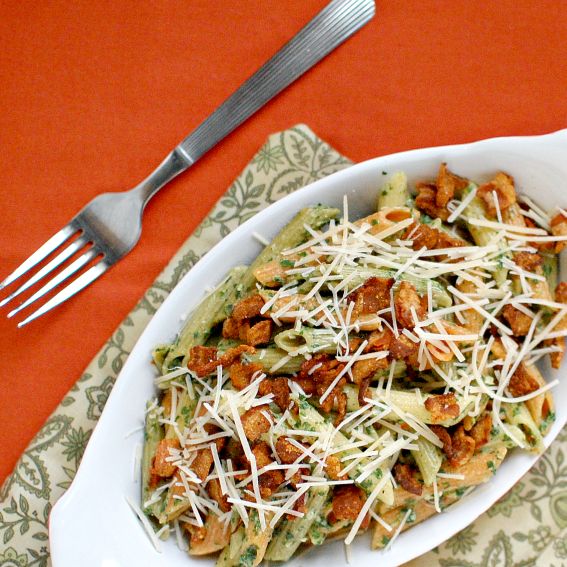
Spinach Bacon Pasta

Last time I posted (which has been a while, I know…and I’m sorry!), I posted a recipe for Spinach Dip.  That dip is super delicious with crackers or chips, but you can also use it as a pasta sauce!  How cool is that?  I threw together this pasta dish with that spinach dip, some bacon, and parmesan cheese.  That’s it.  Super simple, but so full of flavor!

Spinach Bacon Pasta

  • 8 oz pasta of your choice
  • 8 strips bacon, cooked crisp
  • 1/4 cup Spinach Dip
  • Fresh parmesan cheese, grated

Cook pasta according to package directions.  Drain and toss with spinach dip.  Chop or crumble the bacon and toss with pasta.  Place into serving dishes and top with fresh parmesan cheese.

Serves: 4

Sun-tella Spread (Sunflower Seed-Chocolate Spread)

Nutella.  It’s smooth, creamy, delicous.  It’s also kind pricey.  I wanted to try to make my own version.  So, I go to the grocery store only to discover that they don’t carry hazelnuts.  Seriously?  Change of plans.  What can I use in place of the hazelnuts that would still taste yummy.  On a whim, I decided to try sunflower seeds.  Yes.  Sunflower seeds.  The end result was yummy.  Not the same at Nutella, but  yummy none the less. I decided to go with salted sunflower seeds because I love that salty-sweet combination.  If you don’t want the salty-sweet combo, just use unsalted sunflower seeds.   I’m anxious to try other nuts/seeds for other flavors as well! 

 *NOTE* Because this is made with seeds, not nuts, those with nut allergies SHOULD be able to eat this.  But don’t just take my word for it.  Ask your doctor first if you’re not sure.

Sun-tella Spread

  • 1 cup sunflower seeds
  • 4 oz. semisweet chocolate chips, melted
  • 1/2 cup powdered sugar
  • 4-6 teaspoons vegetable oil

Place sunflower seeds in food processor and process until almost powdery.  (If you want a chunkier spread, don’t process quite as long).  Add enough vegetable oil to form a smooth, soft paste.  Pour in the melted chocolate, pulsing until smooth.  Add powdered sugar, pulsing until it forms a smooth, spreadable consistency.    

Store in airtight container.  Because there is no dairy in this spread, and because we’ll eat it up in about 3 days,  I just leave it at room temperature.  If you will be storing it for more than a few days, I’d refrigerate it and let it come to room temp before using.

Makes: 1 cup

WW Points + Per Tablespoon: 3

Lavendar Peach Butter

I have a great neighbor.  She brings me fresh tomatoes from her garden.  She gives me homemade strawberry freezer jam.  And the other day she gave me some fresh basil and fresh lavendar from her garden.  I had never used fresh lavendar in cooking before, so I was excited to try it!  With peaches being so scrumptious right now, I thought it would be great to mix the two flavors.  Thus, Lavendar Peach Butter was born.  This recipe makes a small batch – only about a pint – but you can easily double, triple, or quadruple the recipe if you want to make several jars.

Lavendar Peach Butter

  • 4 ripe peaches, peeled and chopped
  • 2 tbsp water
  • 2 tsp fresh lavendar leaves, chopped
  • juice of one lemon
  • zest of one lemon
  • 1/2 cup sugar

Place water and lavendar in small saucepan.  Bring water to a boil, then reduce heat and let steep for 10-15 minutes.  Add peaches, lemon juice, and lemon zest to pan.  Bring to a boil, then reduce heat and let simmer 15 minutes, stirring occasionally.  The peaches will start to break down and thicken slightly.

With an immersion blender, puree the peach mixture until smooth.  (If you don’t have an immersion blender, you can transfer the mixture to a blender or food processor to puree.  Then, transfer back to the pan.) 

Add sugar and bring to a boil again, stirring until sugar is dissolved.  Reduce heat to simmer and cook for another 25 minutes.  Pour mixture into jars and let cool before adding the lid. 

Store in the refrigerator and use within one week.

Somewhat Skinny Chicken & Pasta San Marco

I found this recipe while flipping through a cookbook I borrowed from the library (which, by the way, is a great place to get recipes…just check out the books, copy down the recipes you like, and return the books!).  I made a few changes to suit my family’s tastes, and to try and make it a little healthier.  It’s still not super low in points, but if you have a salad on the side, you’d have a nice dinner for a reasonable amount of points. 

Somewhat Skinny Chicken & Pasta San Marco

Servings:  6   WW Points Per Serving:  13

San Marco Sauce:

  • 3 tbsp olive oil
  • 2 pounds boneless, skinless chcken breasts, cut into 1-inch cubes
  • 1 large onion, finely diced
  • 3 cloves garlic, minced
  • 1 cup chicken broth
  • 28 oz can crushed tomatoes
  • 1 tbsp flour

Vegetables:

  • 3 tbsp olive oil
  • 2 cup julienned bell peppers (colors of your choice, I like to use a combo of red, green and yellow)
  • 2 cups coarsely chopped broccoli florets
  • 3/4 tsp salt
  • 1/2 tsp pepper
  • 1 tsp dried oregano
  • 1 tsp dried rosemary

Pasta:

  • 6 cups cooked whole wheat spaghetti or fettucine
  • 1 tbsp olive oil

Grated fresh parmesan cheese for serving

Cook pasta and drain.  Add 1 tbsp olive oil and toss to prevent sticking. 

Meanwhile, to make the sauce, preheat a heavy pot over medium high heat and add 3 tbsp olive oil.  When oil is hot, add chicken and saute for 5 minutes or until slightly browned on all sides.  Add onions and cook another 2 minutes.   Add garlic and cook about 30 seconds.  Add chicken broth to the pot and stir to loosen the brown bits from the bottom of the pot.  Add the tomatoes and the flour.  Lower heat to a simmer.  Cover and let simmer, stirring occasioinally, until the chicken is tender, about 5-10 minutes.  Add cooked pasta to the pot and toss to combine.

While the sauce is cooking, prepare the vegetables by adding 3 tbsp olive oil to a skillet over medium high heat.  Add the peppers and broccoli and cook just until crisp-tender.  Add the salt, pepper, and herbs.

To serve, place pasta in serving dish and top with vegetables.  Grate fresh parmesan cheese over top.  Serve immediately.

Skinny Spinach and Chicken Alfredo Pizza

I have ordered this pizza at our local pizza place, and was determined to create a version that is lower in points, yet still delicious.  Here’s what I came up with.  And I aplogize, but I dont’ have a lot of step by step photos for this one, because my family was hungry!

I started with a premade pizza crust.  This pizza has two parts basically – the alfredo sauce, and the chicken topping.  And, it was really good as is, but I really thinking it would be even more awesome with some fresh sliced tomatoes on top!

Start by preparing the spinach alfredo sauce.

Cook the chicken.

Assemble the pizza.

Sauce, chicken, fresh mozzarella cheese.

Bake until golden brown, and serve!

Skinny Spinach & Chicken Alfredo Pizza

Serves: 8        WW Points Plus Per Serving:  8


Alfredo Sauce

  • 1 Tbsp butter
  • 1 tbsp flour
  • 1 cup skim milk
  • 1/4 cup grated fresh parmesan cheese
  • 1 tsp salt
  • 1/2 tsp pepper
  • 1/2 tsp garlic powder
  • 5 oz. frozen spinach, cooked and drained

Chicken:

  • 6 chicken tenders (or 2 chicken breasts), boneless & skinless, sliced thinly
  • 3 tbsp flour
  • 2 tbsp olive oil
  • 2 garlic cloves, minced


  • Prebaked Pizza Crust
  • 8 oz ball of fresh mozzarella cheese, sliced
  • Fresh Tomato, thinly sliced


Prepare chicken by tossing chicken pieces with floru.  Heat olive oil in skillet.  Add garlic and cook until soft.  Add flour coated chicken and cook until cooked through.  Set chicken aside. 

In same skillet, melt butter for sauce.  Add flour and cook for one minute.  Slowly stir in milk, whisking to prevent lumps.  Cook until slightly thickened.  Add parmesan cheese, salt, pepper, and garlic powder.  Stir in spinach.

Spread sauce on crust.  Top with cooked chicken.  Lay fresh mozzarella slices over all.  Top with fresh tomato slices.  Bake for 15 minutes at 475 degrees until golden brown and bubbly.

Lemon Chicken with Mushroom Sauce


I don’t know about you, but I love just about anything with lemons.  Lemonade.  Lemon Pie.  Lemon Bars.  You name it.  So, when a friend shared the link to this recipe, I knew I had to try it.  I made a few minor changes to it, because, well, I rarely stick to a recipe exactly.  I’m wierd that way.

If you don’t lik the mushrooms, I encourage you to go ahead and make the creamy sauce without them.  It won’t be the same, but you don’t want to leave out the lemony sauce completely.  You could even substitute onions for the mushrooms, I think.

Start by coating 4 chicken breasts (or chicken tenders in my case) with 1 tbsp olive oil. 

Heat a large skillet to medium-high heat and place chicken in skillet.  Season with salt and pepper and cook on both sides until just browned.

Zest the lemon; set zest aside for later. 

Squeeze the juice of half the lemon over chicken.  Slice remaining half of lemon into thin slices.  Place slices on top of browned chicken.

Cover with lid and cook until chicken is cooked through.

Meanwhile, in seperate skillet, melt 2 tbsp butter over medium heat.  Add 3 cups sliced mushrooms and cook, stirring often, until mushrooms are browned and have released their juices.

Once mushrooms have browned, sprinkle 2 tbsp flour over mushrooms and stir to combine.

Stir in 1/2 cup chicken broth and cook until sauce has thickened.

Just before serving, a just a splash of heavy cream (this gives the sauce a rich, creamy consistency) and add in lemon zest and 1 tbsp parsley.

Place chicken on serving plate and top with sauce.

PRINTABLE RECIPE:

Lemon Chicken with Mushroom Sauce4 boneless, skinless chicken breasts

1 tbsp olive oil

1 lemon

2 tbsp butter

3 cups sliced mushrooms

½ cup chicken broth

2 tbsp flour

1 tbsp parsley

Salt & Pepper to taste

Splash heavy cream

Coat chicken with olive oil. Place in hot skillet and sprinkle with salt and pepper. Cook on both sides until just brown.

Zest the lemon; set zest aside. Squeeze the juice of half the lemon over chicken. Slice remaining lemon half into slices. Top each chicken breast with 1-2 slices of lemon. Cover and cook until chicken is cooked through.

Meanwhile, melt butter in skillet over medium heat. Add mushrooms and cook, stirring often, until the mushrooms are browned and have released their juices, about 6 minutes.

Sprinkle with flour and stir. Add chicken broth, stirring to make a thick sauce. Stir in a just a splash of heavy cream. Add lemon zest and parsley at the last minute. Spoon over cooked chicken and serve immediately.


Sofrito Tilapia

Last week I was at the gym, running on the treadmill and watching the Today show.  They were making a dish that looked very easy, yummy, and healthy…Sofrito Fish.  I knew I had to make this recipe.  Soon.  So, as soon as I got home I got on their website and printed off the recipe.  I made a few little changes, and here’s what I came up with.

This recipe is actually a ‘two-part’ recipe, because you make the Sofrito butter mixture, and then use part of the mixture on the fish, part of it for a sauce to go over the fish, and the rest you can add to rice to go with your fish. 

To make the Sofrito butter, place 2 tbsp oil in skillet over medium heat.  Add 1 small bell pepper, diced (I used a mixture of red, yellow, and green bell peppers), 1 clove of garlic, minced, and 1/2 small onion, diced.  Cook until veggies are tender.

Place this mixture in the food processor or blender along with 4 tbsp softened butter.  Blend until smooth.

That’s your Sofrito Butter.

Now, on to the fish.  The folks on the Today show used Red Snapper, but I chose to use Tilapia because that’s what I had.  I think any firm white fish would work well with this.  Season the fish with salt and pepper on both sides and place in a baking dish coated with cooking spray.  Brush about half of the Sofrito Butter over the fish fillets.

Pour just enough water into the baking dish to cover the bottom.  This will help steam the fish while it cooks.

Bake the fish at 400 degrees for 8-10 minutes, or until a metal skewer can be easily inserted into the fish and, when left in for 5 seconds, feels warm when touched to the lip.

While the fish is baking, we’ll make the Sofrito Sauce.  In the skillet you sauted the veggies in, bring 1/2 cup chicken stock to a boil.  Whisk in about half the reamining sofrito butter.

Season to taste with salt and pepper.  Just before serving, stir in 1/4 cup lime juice.

To serve the fish, place some of the sauce on the plate…

Top with the fish.  (Sofrito Rice is also pictured…keep reading for recipe)

BONUS RECIPE:  Sofrito Rice

Heat 2 tbsp olive oil in a medium sized pot over medium heat.  Stir in 1 3/4 cups rice, coating the rice with the oil.  Add3 1/2 cups water and 2 tsp salt.  Bring to a boil.  Lower heat slightly and cover.  Do not stir the rice!!  Let cook, without stirring until the rice is tender, about 20 minutes.  Just before serving, stir in the reamining Sofrito Butter.

BBQ Pork Ribs

Now that the weather is starting to warm up, it’s time to start firing up the grill!  Today I’m going to share with you our favorite way to make BBQ Pork Ribs.  Now, for my Weight Watchers friends, I must say – “This is NOT something we eat often!”  It really is like a special treat to us, something we fix for special occasions.  I save up my weekly points when I know we’re going to be having ribs!

These ribs are super delicious.  The beefed up barbecue sauce is wicked good and the ribs will just fall off the bone when you prepare them this way.  It takes some time, so you do have to plan ahead, but trust me…it’s SO worth it!

To get started, you need to place your ribs in a large pot and cover them with water.  Place a lid on the pot and bring them to a boil.

Now, turn the heat down to low and cook, covered, for one hour. 

At this point, the meat will look plain gross.  But, don’t give up!

Now, let’s make our barbecue sauce.  I just use a bottle of honey flavor barbecue sauce and beef it up.  Here’s how.

Start by dicing up an onion and a garlic clove.  Saute these in one tbsp of oil until softened.

Now, add a bottle of your favorite barbecue sauce – I like the honey flavor, because I like sweet barbecue sauce.  But use what you like.

Now this is where the good stuff comes in.  I add either a 1/2 can of beer, OR a couple ounces of whisky (only Maker’s Mark around here!).  This really intesifies the flavor of the bbq sauce, and you get nice subtle undertones of the alcohol.

I add the beer or whisky to the barbecue sauce bottle and shake it, so that I get every last drop of sauce out of the bottle.

Now, add this to the sauce in the pan.  Bring the mixture to a boil, reduce heat and simmer for about 20 minutes.  It will thicken as it cooks.

Now, you’re ready to fire up the grill!

Pat the ribs dry and lay them on the grill.  Baste with the bbq sauce.

Let them cook about 3-4 minutes and turn.  Baste again.

Repeat the cooking, flipping and basting every 3-4 minutes.  If you don’t flip the ribs often, the sauce will burn.  Nobody likes burned bbq sauce!  So, flip and baste, flip and baste, until the ribs are cooked through.  It should only take about 20 -25 minutes total. 

Now, dig in!

Homemade Ranch Dressing…makes everything taste better

So, PW shared a recipe for Homemade Ranch Dressing once.  I never printed it off or tried it because I thought “How in the world can you make delicious ranch dressing at home?  It’s probably nowhere near the same taste as the bottled stuff.”  Well, someone should slap me for that comment.  Why on earth would I think that something in a bottle would taste better than homemade?  I must’ve had a brain fart. 

Fastforward to a few weeks ago.  I wanted salad and was out of the bottled stuff  I wanted to redeem myself, so I went back to PW’s Blog, printed the recipe and tried it myself.  Come along as I try my hand at this homemade Ranch Dressing.  We’ll just see if it really is as good (or better??) than the bottled stuff.  We’ll just see.

Let’s do this thing.

Grab a bowl and dump in a cup of mayo.  Use the REAL stuff people, not the fake junk.  Sacrifice something else in your diet this week if you need to, but we need the real stuff here.stuff 374

Grab some sour cream and add 1/2 cup to the bowl.

stuff 375

Stir that together real good.  Now, let’s go over to the cutting board.

Grab a clove of garlic.  Chop it up pretty good.

stuff 377

Sprinkle the garlic with some salt, oh, just shy of 1/4 tsp.  Then, mash it all up with a fork until it becomes like a paste.

stuff 378

stuff 379

Now you need to chop up about a 1/4 cup of fresh parsley and a couple tbsp of fresh chives.  I was amazed that I still had some growing in my herb pots this time of year, but if you don’t have any growing in your garden, you can almost always find these in the grocery store produce isle. 

Toss the chopped herbs into the bowl with the mayo/sour cream.

stuff 381

Now, you need to add some milk/buttermilk to get it to the right consistency.  Buttermilk will give it a nice tangy taste, but if you’re like me, you never have buttermilk on hand.  So, I fake it.  I take a little regular milk, add a splash of lemon juice to it,  and let it sit on the counter for a minute or so.  The lemon juice will thicken the milk a bit and give it a nice tangy flavor.  You can use this trick for pretty much any recipe that calls for buttermilk.  But I probably wouldn’t try drinkin’ it.  That’d just be gross I think.  Anyway, back to the dressing.  Pour your buttermilk, or fake buttermilk…maybe we’ll call it futtermilk…into the mayo mixture a little at a time.

stuff 382

Add just enough futtermilk to get it to the consistency you like.  Stir it all together and give it a taste.   I would suggest actually tasting it on a piece of lettuce and not just using a spoon or your finger. 

stuff 383

I know what you’re thinking.  That was too simple, right?  Mayo, sour cream, buttermilk, garlic and herbs.  That’s IT?  Yup.  That’s it.  Of course, you can add other stuff if you want, like vinegar, dill, worcestershire sauce, cayenne pepper, paprika,  tobasco, other fresh herbs or anything else that tickles your fancy.  But me?  I like it plain and simple. 

Store in an airtight container in the fridge.  It will thicken some as it chills, so you might need to add a little more futtermilk to thin it down later.  It’s all good.

stuff 396

 This stuff is awesome people.  I think the heavens opened up and I heard the angels sing when I tasted this stuff.  I’ll never buy that bottled stuff again.  Never in a million years.  This stuff is That. Good.

Printable Recipe:  Homemade Ranch Dressing